I know that most of you come here because you love good deals, simple recipes, and straight-shooting financial advice. I love that you love those things, because I love them, too!
But there’s another thing that I enjoy talking to my readers about and that’s blogging. At least once or twice a month, I get an email from a reader that goes something like this: “Hi, I’m thinking about starting a blog, but I don’t know where to start!”
This post is my opportunity to consolidate my responses to this frequently asked question. If you’re thinking about starting a blog, this guide will get you there — in just 15-20 minutes and only $2.95 per month! Whether you want to blog for income or for fun (or both!), you can do it by following these four simple steps.
But before you get started, you need to ask yourself one question: “Why?”
If you love to write, then blogging is a natural choice. But it’s important to keep in mind that blogging is a VEHICLE. The question is: What’s your destination? Why are you writing? How do you want to impact people?
The very first blog I ever wrote was a private family blog – so private, in fact, that it was password-protected. That blog was just a collection of stories about my children and our life at the time in Israel.
When we moved to America, I began working as a freelance writer and many of my assignments were to “ghost write” blog posts for my corporate clients. Blogging for a wider audience – even if it wasn’t “my” audience – totally turned me on to the power of this platform.
Eager to discover my own voice, I started a short-lived blog called “Greener Parenting” – about some of the eco-friendly choices we were trying to make at home. The site petered it out pretty quickly, though, because while recycling is important, it wasn’t my passion.
You see, I was forcing the “why” to fit the vehicle. I knew I wanted to write, but I still wasn’t really sure what I wanted to write about.
A year later, I finally got turned on to blogging about my true passion: BUDGETING & SAVING MONEY! And the rest, as they say, is history.
Kosher on a Budget has grown immensely over the last almost 6 years, and so have I as a blogger. But when I first got started, it took me hours upon hours upon HOURS to figure out how to do even the simplest tasks.
That’s why I’m putting together this Quick Guide to Blogging — to walk you through the initial steps of setting up your blog in a simple, time-saving manner.
This is the guide I wish I’d had eight years ago when I started Kosher on a Budget and I’m glad to offer to you — to make your entry into blogging a bit less nail-biting.
Step 1: Choose a Name
Step 2: Get Hosted
Step 3: Install WordPress
Step 4: Pick a Theme & Make It Look Good
Step 1: Choose a Name
Remember what I said above: A blog is the vehicle. The “destination” is usually what inspires most of us to become bloggers — and if you’ve got a destination gnawing at your heart, you already know what I’m talking about.
Maybe you love cooking. Maybe you love fashion. Maybe you are an incredible hostess, gardener or DIYer. Maybe you’re a kindergarten teacher with off-the-chart curriculum ideas. Maybe you have a story about survival that needs telling.
Once you know your topic, it’s time to think about the name of your site – and specifically a name that has a unique URL to go along with it. It doesn’t have to be the same as the name of your blog, but it’s better if it is.
(Little known fact: I originally considered naming my blog FrumandFrugal.com. So glad my husband nixed that!)
Brainstorm as many different ideas as you can. Free associate. Ask your spouse, your friends, your Facebook network (unless you’re afraid one of them will pounce on the idea and start their own blog about it first!).
Narrow down your choices to the top three or four options — just remember: If your blog grows into your full-time job, you are going to be saying its name more often than your kids’ names. So be sure you really love it!
Once you have a few options, you need to find out if those domain names are still available. There are lots of sites that will allow you to check domain name availability, but I recommend that you head over to BlueHost.com (you’ll see why in a minute).
You can quickly see if your preferred domain name is available simply by entering it in the box below and clicking “Check Availability”.
If your preferred domain name is available, you’re golden – and ready to move on to Step 2! If not, keep trying your other options.
A few quick tips about choosing a domain name:
Tip #1: You absolutely want to choose a domain name that has .com at the end. If you want to name your blog KitchenTips.com, but that’s already taken, don’t buy KitchenTips.net instead. Not only might you get sued by the folks with the .com address, you will also be fighting a losing battle to be found on Google search results.
Tip #2: Don’t get cute by misspelling a word in your domain name. Be simple and straight-forward. People will remember it more easily – and Google will find you (i.e. “index” you) more quickly.
Step 2: Get Hosted
Remember that first password-protected blog I had? That blog was hosted on Blogger.
You can still start a blog on Blogger today… but I don’t recommend it. And here’s why: Hosting a blog for free on Blogger (or WordPress.com), is like building a house on land that someone else owns.
Yes, it costs a little bit of money (very little – like just $2.95 per month right now with this awesome BlueHost sale! – which is the host I recommend you use when you’re starting out) to host your own site, but it’s definitely worth the investment. There are many advantages to self-hosting, but here are the two that will be most relevant to you:
- Plugins — I don’t want to get too technical (we can do that in another post down the road), but your life – and blog – will be infinitely better if you can take advantage of some of the great FREE plugins that are out there. And only self-hosted blogs can do this.
- Monetizing — Maybe you don’t have any interest in earning money from your writing, but many bloggers would like to make at least enough to cover their operating costs. A self-hosted blog makes monetizing far easier and more robust.
There are hundreds of companies out there that can host your site, but for the vast majority of bloggers, I have one recommendation: Blue Host.
Blue Host is where I hosted Kosher on a Budget for the first 2.5 years of the blog and I’d make the same decision again today in heartbeat. They offer reliable, secure hosting at a fraction of the cost of their competitors. Right now, their monthly rate is just $3.95/month. Crazy cheap.
They keep prices low by utilizing shared servers, which were perfect for my needs until I had over 150,00 page views per month (at which point I did find that I needed more “bandwidth”, so I moved to a more private server option– that costs me about 15 times as much. ☹ )
In addition to their low monthly hosting fees, if you decide to host with Bluehost, they will also give you your domain name for FREE — which usually costs $15 per year. More savings!
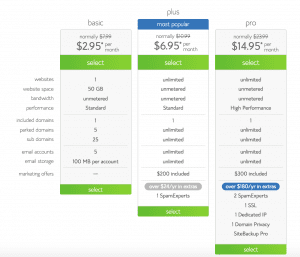
There are three hosting options with BlueHost, but I recommend going with the most basic one that’s just $3.95 per month. If, after a few months, you find that you need more bells and whistles, you can always upgrade — but I never did find it was necessary.
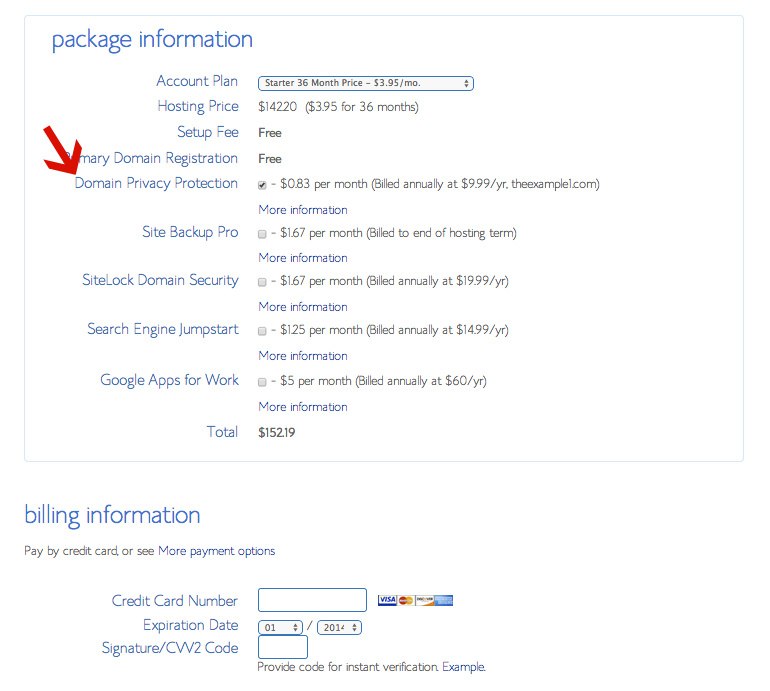
The only “add-on” that I recommend opting in for is the Domain Privacy Protection, also known as the “WhoIs Privacy Shield”. This shields your personal address and phone number from being displayed to the public. It’s billed as a one-time annual charge of $9.99.
Step 3: Install WordPress
After you sign up with Bluehost, your blog has a “plot of land” — a corner of the Internet to call home. Next, you need to start building the foundation of that home. This foundation is your blog’s back-end – the place that you create and upload all the content that you will be sharing.
There are a few different software options out there for your “foundation”, but the one that is FAR and AWAY the most popular is called WordPress. WordPress is the software I have used on Kosher on a Budget since Day 1, and it’s not only very simple to use, it’s also FREE!
Note: If you’re Googling around for more information, make sure that you are using WordPress.ORG not WordPress.COM. WordPress.com is like Blogger – you don’t own your site with it.
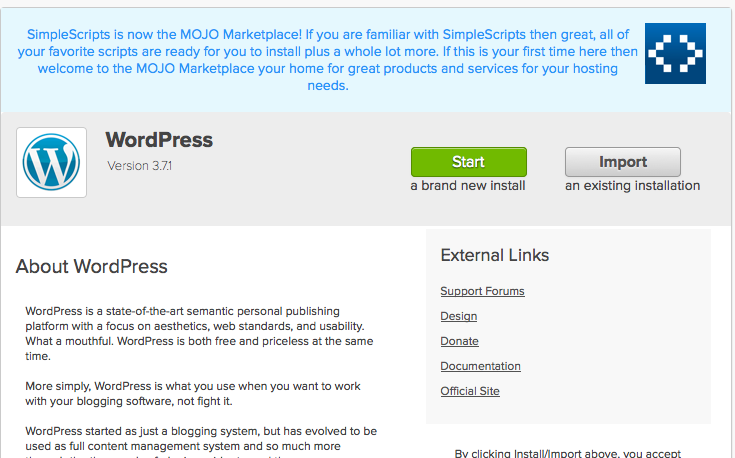
Once you sign up for Bluehost, you can actually install WordPress from right inside your Bluehost dashboard and it’s pretty easy to do. I’m definitely not a techy person, and I was able to do it in under 10 minutes, so I’m sure you can, too!
- Login to your Bluehost account and navigate to the MOJO Marketplace section. From there, click on the WordPress logo.
- Under the “Do It Yourself FREE” section (you can do this!), click the Install button.
- Click on the “Check Domain” button (you probably already did this in Step 1, but now that you’re ready to really rock and roll, you’ll need to do it again.)
- Check the Terms & Conditions Box and then click “Install Now”
- Breathlessly wait while your blog is created…… And…… Wheee! You’re live!
- Before closing this window, be sure to click on the “View Credentials” button at the top of the page and write down the following: Your Admin URL, Username and Password.
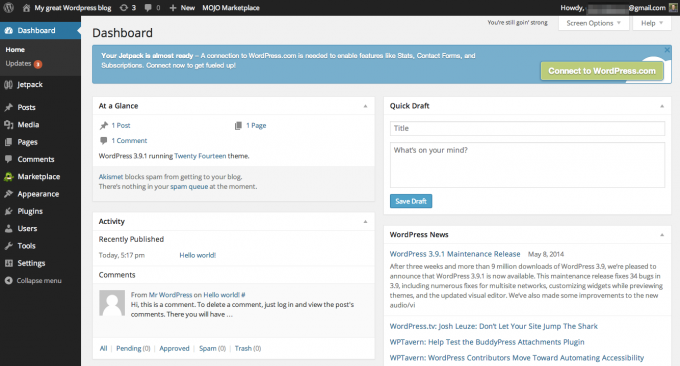
- Head over to your admin URL, and enter the username and password you just recorded – and that’s it! You’re now inside WordPress. Ready to write your first post? Click on “Posts > Add New” and start typing!
A few quick tips about Word Press installation…
Tip #1: You may get a warning that you are overwriting files, but as long as you don’t have another website built yet, you can check the box and continue. This is mostly to make sure that you really want to install in that location.
Tip #2: Show Advanced Options to set up your own username and password. Choose a very strong password!
Tip #3: Also, make sure that the “Automatically create a new database for this installation” box is checked (unless you have a database that you already set up – which, if you’re reading this Quick Start Guide, you probably don’t).
If you’re still stumped with the set-up, you can check out this quick video tutorial, courtesy of Blue Host.
Step 4: Pick a Theme
You’re almost ready to start publishing your content for the world, but there is one more slightly-techy-but-not-really thing I need to tell you about: Installing a Theme.
Remember when I said WordPress is the foundation of your home? Well, you still need walls and a roof, right? Some of us live in a townhouse, others in a ranch or a two-story colonial. These are all homes, but they have different looks and feels. The way you differentiate the look and feel of your blog is with your THEME.
WordPress offers a ton of FREE themes you can choose from — and you can always change it up if you get bored, or just don’t like it after a while. I used a free theme for the first six months of this blog. It wasn’t beautiful, but it worked!
Why didn’t I go the designer blog route right off the bat? Because I didn’t want to spend a penny more than I had to while I was getting my feet wet. You can hire a designer and spend a few hundred (or several thousand) dollars up front. But I really think it’s best to start slow. If the traffic – and the money – starts pouring in, then by all means – invest in a fancy pants design.
There is something between FREE and FANCY PANTS, however, and that’s a Premium WordPress theme. These themes are more unique and far more customizable than the free themes. It’s like starting with a standard builder plan for your home, but then tweaking it so you’ve got an upgraded kitchen and a first-floor laundry room.
If you want to spend a bit of time and energy to customize your blog’s look and feel, I recommend checking out the following PREMIUM themes:
- The Thesis Theme – This is the first premium theme that I purchased for Kosher on a Budget. It served me very well and I still highly recommend it.
- The Genesis Theme by Studio Press – This is the current theme that I use on Kosher on a Budget. One of the benefits of Genesis is that it is highly customizable, including some sub-themes (known as “child themes”) that are fully optimized for mobile. It does take a bit more learning on the front end, though — so if “tech stuff” isn’t your forte, it might be better to wait on this one while you work on building up your content first.
- Elegant Themes – I’ve never used an Elegant theme, but I’ve heard good things. They are a bit more affordable than the first two (there are dozens of themes for around $69), so if money is tight, Elegant Themes might be a good option for you.
If you want to create some quick graphics to install into your theme’s header, definitely check out PicMonkey and Canva, both of which are free. Canva even offers free tutorials on how to use their software.
Once you’ve installed your theme and prettied it up a bit, you are ready to launch your blog! It’s got a foundation, walls and a roof – and they all look good!
The time has finally come to start filling your online home with content – the words and pictures that you will share with the world.
What, how, and how often to write are a subject for another blog post, but I’d like to leave you with one last thought: If you find yourself suffering from a bit of performance anxiety, take heart. Writing is like any other “habit” – the more you do it, the easier it gets.
So go get started! And drop a link in the comments to your new blog. I’d love to check it out!




Thanks Mara!!! This is a great post!
Thank you, Chana! I’m glad to hear that!
Great advice, thanks!
What about websites for very small businesses, do you have any recommendations for those? Wix?
Do you mean e-commerce sites? I actually don’t know as much about the security requirements involved with that, but I could put you in contact with someone who could help! Let me know if you want more information.